一、简介
内网低交互蜜罐opencanary:
opencanary是2015年blackhat在单独发布环节推出的的一款蜜罐工具,纯python模拟多种应用和服务。当模拟的服务被某人使用(交互登录)时,它就会产生相应的日志。
Github项目地址
1.1 模拟服务:
1.端口扫描行为
2.ftp登录尝试
3.web蜜罐被访问
4.web蜜罐被登录
5.ssh建立连接
6.ssh远程版本发送
7.ssh登录尝试
8.telnet登录尝试
9.mysql登录尝试
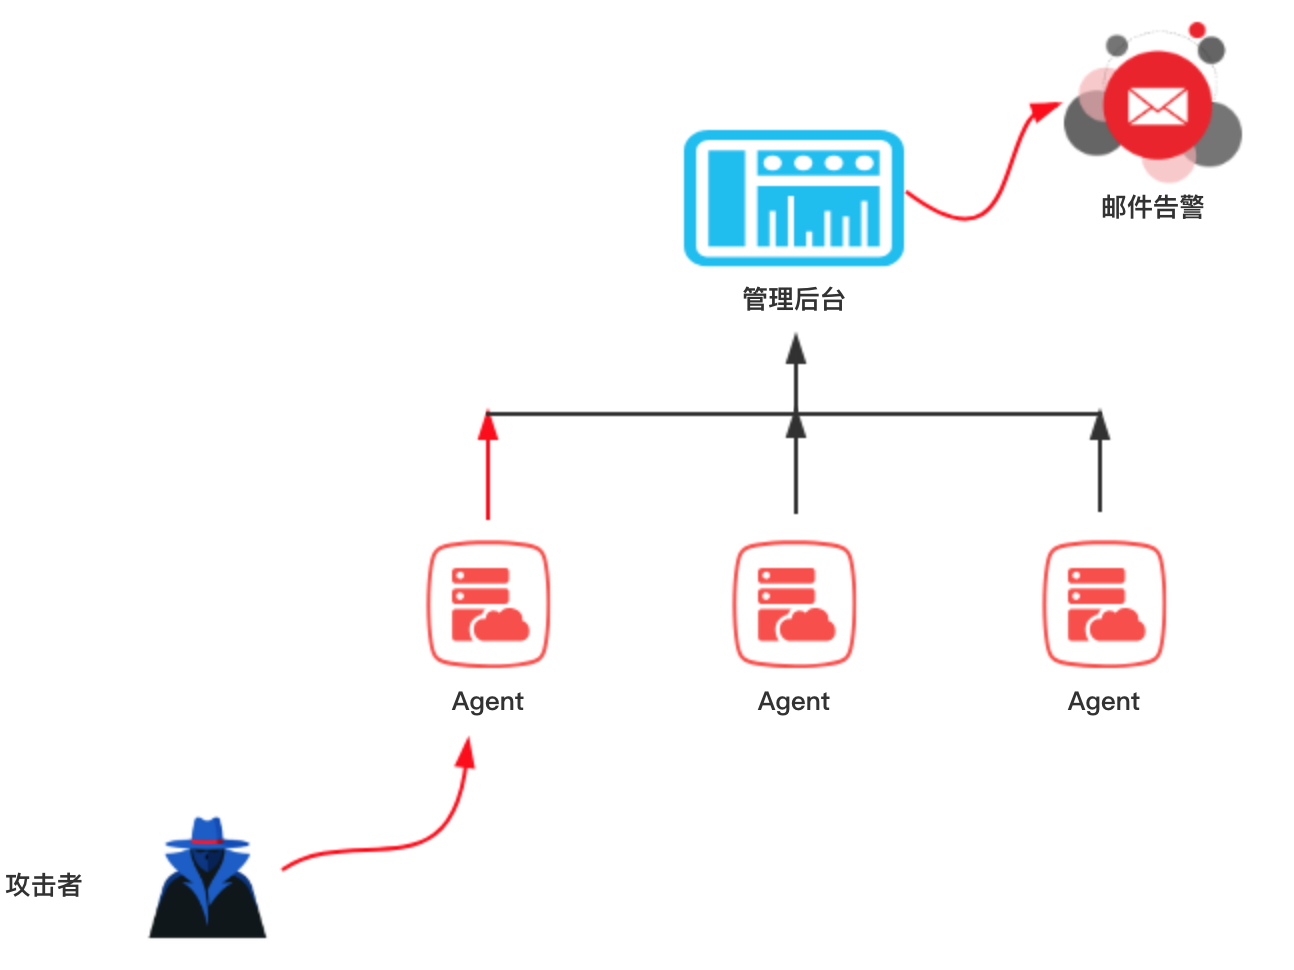
项目架构图:
二、安装管理后台
2.1 安装环境
安装系统:Centos7 64位系统
Python使用系统自带的 Python 2.7
2.2 系统配置
关闭selinux
setenforce 0
vim /etc/selinux/config

# This file controls the state of SELinux on the system.
# SELINUX= can take one of these three values:
#     enforcing - SELinux security policy is enforced.
#     permissive - SELinux prints warnings instead of enforcing.
#     disabled - No SELinux policy is loaded.
SELINUX=disabled
 SELINUXTYPE= can take one of three two values:
#     targeted - Targeted processes are protected,
#     minimum - Modification of targeted policy. Only selected processes are protected.
#     mls - Multi Level Security protection.
SELINUXTYPE=targeted
然后重启服务器,selinux 便永久生效了
查看系统Python版本
root@node1 ~]# python -V
Python 2.7.5
[root@node1 ~]#
2.3 tornado安装
下载web源码和安装依赖
[root@node1 src]# git clone https://github.com/p1r06u3/opencanary_web.git
正克隆到 'opencanary_web'...
remote: Enumerating objects: 46, done.
remote: Counting objects: 100% (46/46), done.
remote: Compressing objects: 100% (34/34), done.
remote: Total 1083 (delta 20), reused 30 (delta 11), pack-reused 1037
接收对象中: 100% (1083/1083), 3.78 MiB | 101.00 KiB/s, done.
处理 delta 中: 100% (558/558), done.
[root@node1 src]# cd opencanary_web/
[root@node1 opencanary_web]# pip install -r requirements.txt
2.4 安装配置mysql
2.4.1 下载mysql5.7 安装包
wget http://dev.mysql.com/get/mysql57-community-release-el7-8.noarch.rpm
2.4.2 安装mysql 源
yum localinstall mysql57-community-release-el7-8.noarch.rpm
2.4.3 检查mysql源是否安装成功
yum repolist enabled|grep "mysql.*-community.*"
2.4.4 安装mysql
yum install mysql-server
2.4.5 启动mysql并设置开机自启动
systemctl start mysqld
systemctl enable mysqld
systemctl daemon-reload
2.4.6 修改mysql本地登陆密码
mysql安装完成后在/var/log/mysqld.log文件中给root用户生成了一个默认密码
通过以下方式找到root默认密码,然后登录mysql进行修改:
[root@node1 ~]# grep 'temporary password' /var/log/mysqld.log
2019-07-20T13:07:38.462181Z 1 [Note] A temporary password is generated for root@localhost: ponNmM,qj0<Z
root@localhost: 后面就是默认初始密码
登录mysql:mysql -u root -p
[root@node1 ~]# mysql -u root -p
Enter password:
Welcome to the MySQL monitor.  Commands end with ; or \g.
Your MySQL connection id is 4
Server version: 5.7.26

Copyright (c) 2000, 2019, Oracle and/or its affiliates. All rights reserved.

Oracle is a registered trademark of Oracle Corporation and/or its
affiliates. Other names may be trademarks of their respective
owners.

Type 'help;' or '\h' for help. Type '\c' to clear the current input statement.

mysql>
重置mysql密码
执行修改密码语句:ALTER USER 'root'@'localhost' IDENTIFIED BY 'new-password';
mysql>  ALTER USER 'root'@'localhost' IDENTIFIED BY 'new-password';     ---新密码需要符合要求,即密码组成应由大、小写字母、数字、符号组成
Query OK, 0 rows affected (0.00 sec)

mysql>  flush privileges;
Query OK, 0 rows affected (0.00 sec)

mysql> exit
Bye
2.4.7 创建mysql数据库和表结构
切换到opencanary_web目录
cd /usr/local/src/opencanary_web
登陆mysql创建数据库并还原表结构
create database honeypot;
use honeypot;
source honeypot.sql;
这时数据库中User表内默认用户名和密码为:admin\admin
若要修改web后台登录密码请执行sql语句password的值换成自己的32位md5:
UPDATE User SET password='900150983cd24fb0d6963f7d28e17f72' WHERE id=1;
修改web数据库连接密码
vim /usr/local/src/opencanary_web/dbs/initdb.py
修改:
DB_PWD = ''  修改为自己的mysql密码
2.4.8 单tornado实例启动测试
python server.py --port=80
[root@node1 opencanary_web]# python server.py --port=80
Development server is running at http://127.0.0.1:80/
若输出”Development server is running at http://0.0.0.0:80/ “,且访问主机的ip能够显示出登录后台地址,则web单实例后台启动成功。
2.5 安装配置supervisor
Supervisor( http://supervisord.org/ )是用Python开发的一个client/server服务,是Linux/Unix系统下的一个进程管理工具,不支持Windows系统。它可以很方便的监听、启动、停止、重启一个或多个进程。
用Supervisor管理的进程,当一个进程意外被杀死,supervisort监听到进程死后,会自动将它重新拉起,很方便的做到进程自动恢复的功能,不再需要自己写shell脚本来控制。
2.5.1 supervisor
yum install supervisor
设置开机自启动
systemctl enable supervisord.service
2.5.2 配置文件
supervisord 的配置 文件是 /etc/supervisord.conf
自定义配置文件目录是/etc/supervisord.d/,该目录下文件以.ini为后缀
这里给出我的supervisor子配置:
vi /etc/supervisord.d/tornado.ini
[group:tornadoes]
programs=tornado-8000,tornado-8001,tornado-8002,tornado-8003

[program:tornado-8000]
command=python /usr/local/src/opencanary_web/server.py --port=8000
directory=/usr/local/src/opencanary_web
autorestart=true
redirect_stderr=true
stdout_logfile=/var/log/tornado.log
loglevel=debug

[program:tornado-8001]
command=python /usr/local/src/opencanary_web/server.py --port=8001
directory=/usr/local/src/opencanary_web
autorestart=true
redirect_stderr=true
stdout_logfile=/var/log/tornado.log
loglevel=debug

[program:tornado-8002]
command=python /usr/local/src/opencanary_web/server.py --port=8002
directory=/usr/local/src/opencanary_web
autorestart=true
redirect_stderr=true
stdout_logfile=/var/log/tornado.log
loglevel=debug

[program:tornado-8003]
command=python /usr/local/src/opencanary_web/server.py --port=8003
directory=/usr/local/src/opencanary_web
autorestart=true
redirect_stderr=true
stdout_logfile=/var/log/tornado.log
loglevel=debug
2.5.3 启动supervisor
systemctl start supervisord
其他常用命令:
systemctl stop supervisord      # 停止supervisord
systemctl restart supervisord   # 重启supervisord
2.5.4 启动多tornado实例
supervisorctl start tornadoes:*
其他更多supervisord 客户端管理命令
supervisorctl status                    # 状态
supervisorctl stop nginx                #关闭 nginx
supervisorctl start nginx               #启动 nginx
supervisorctl restart nginx             #重启 nginx
supervisorctl reread
supervisorctl update                    #更新新的配置
2.5.5 查看应用web是否启动成功
ps aux|grep python
root      3303  0.0  0.9 562428 18316 ?        Ssl  7月12   0:49 /usr/bin/python -Es /usr/sbin/tuned -l -P
root     14126  0.0  0.7 224872 13804 ?        Ss   22:25   0:00 /usr/bin/python /usr/bin/supervisord -c /etc/supervisord.conf
root     14128  0.6  1.9 335660 36356 ?        Sl   22:25   0:00 python /usr/local/src/opencanary_web/server.py --port=8000
root     14129  0.6  1.9 409648 37572 ?        Sl   22:25   0:00 python /usr/local/src/opencanary_web/server.py --port=8001
root     14130  0.6  1.9 335664 36364 ?        Sl   22:25   0:00 python /usr/local/src/opencanary_web/server.py --port=8002
root     14131  0.6  1.9 335664 36360 ?        Sl   22:25   0:00 python /usr/local/src/opencanary_web/server.py --port=8003
root     14279  0.0  0.0 112728   980 pts/0    R+   22:27   0:00 grep --color=auto python
2.6 安装nginx反向代理tornado
2.6.1 安装nginx
可以使用源码编译安装和yum安装
这里使用yum安装 。。。。省事
yum -y install nginx
2.6.2 nginx反向代理tornado配置
先备份nginx配置文件
cp /etc/nginx/nginx.conf /etc/nginx/nginx.conf.bak
修改配置文件
    user nginx;
worker_processes 5;
error_log /var/log/nginx/error.log warn;
pid    /var/run/nginx.pid;
events {
    worker_connections 1024;
}
http {
    include    /etc/nginx/mime.types;
    default_type application/octet-stream;
    log_format main '$remote_addr - $remote_user [$time_local] "$request"'
            '$status $body_bytes_sent "$http_referer" '
            '"$http_user_agent" "$http_x_forwarded_for"';
    access_log /var/log/nginx/access.log main;
    sendfile    on;
    #tcp_nopush   on;
    keepalive_timeout 65;
    #gzip on;
    fastcgi_connect_timeout 1800;
    fastcgi_send_timeout 1800;
    fastcgi_read_timeout 1800;
    fastcgi_buffer_size 1024k;
    fastcgi_buffers 32 1024k;
    fastcgi_busy_buffers_size 2048k;
    fastcgi_temp_file_write_size 2048k;
    map $http_upgrade $connection_upgrade {
    default upgrade;
    ''   close;
    }
    include /etc/nginx/conf.d/*.conf;
}
测试配置文件是否正确
/sbin/nginx -t    --使用-t参数进行验证nginx配置文件是否正确
nginx: the configuration file /etc/nginx/nginx.conf syntax is ok
nginx: configuration file /etc/nginx/nginx.conf test is successful
2.6.3 添加/etc/nginx/conf.d/hp.conf配置
vi /etc/nginx/conf.d/hp.conf
upstream hp {
    server 127.0.0.1:8000;
    server 127.0.0.1:8001;
    server 127.0.0.1:8002;
    server 127.0.0.1:8003;
}
server {
    listen  80;
    server_name localhost;
    proxy_connect_timeout 10d;
    proxy_read_timeout 10d;
    proxy_send_timeout 10d;
    location /static/ {
        alias   /usr/local/src/opencanary_web/dist/static/;

    }
    location / {
        proxy_pass http://hp;
        proxy_pass_header Server;
        proxy_set_header Host $http_host;
        proxy_redirect off;
        proxy_set_header X-Real-IP $remote_addr;
        proxy_set_header X-Scheme $scheme;
        proxy_set_header X-Forwarded-For $proxy_add_x_forwarded_for;
        proxy_http_version 1.1;
        proxy_set_header Upgrade $http_upgrade;
        proxy_set_header Connection "upgrade";
    }
}
启动/重启nginx
启动:
/sbin/nginx
查看nginx是否已经启动L
ps -aux | grep nginx
root     15002  0.0  0.0  56724  1212 ?        Ss   22:41   0:00 nginx: master process /sbin/nginx
nginx    15003  0.0  0.1  57212  2040 ?        S    22:41   0:00 nginx: worker process
nginx    15004  0.0  0.1  57212  2040 ?        S    22:41   0:00 nginx: worker process
nginx    15005  0.0  0.1  57212  2040 ?        S    22:41   0:00 nginx: worker process
nginx    15006  0.0  0.1  57212  2040 ?        S    22:41   0:00 nginx: worker process
nginx    15007  0.0  0.1  57212  2040 ?        S    22:41   0:00 nginx: worker process
root     15034  0.0  0.0 112728   980 pts/0    R+   22:41   0:00 grep --color=auto nginx
访问主机ip的80端口,查看是否可以正常访问、正常登陆。
2.7 登陆管理后台
http://ip
2.7.1 登陆页面:

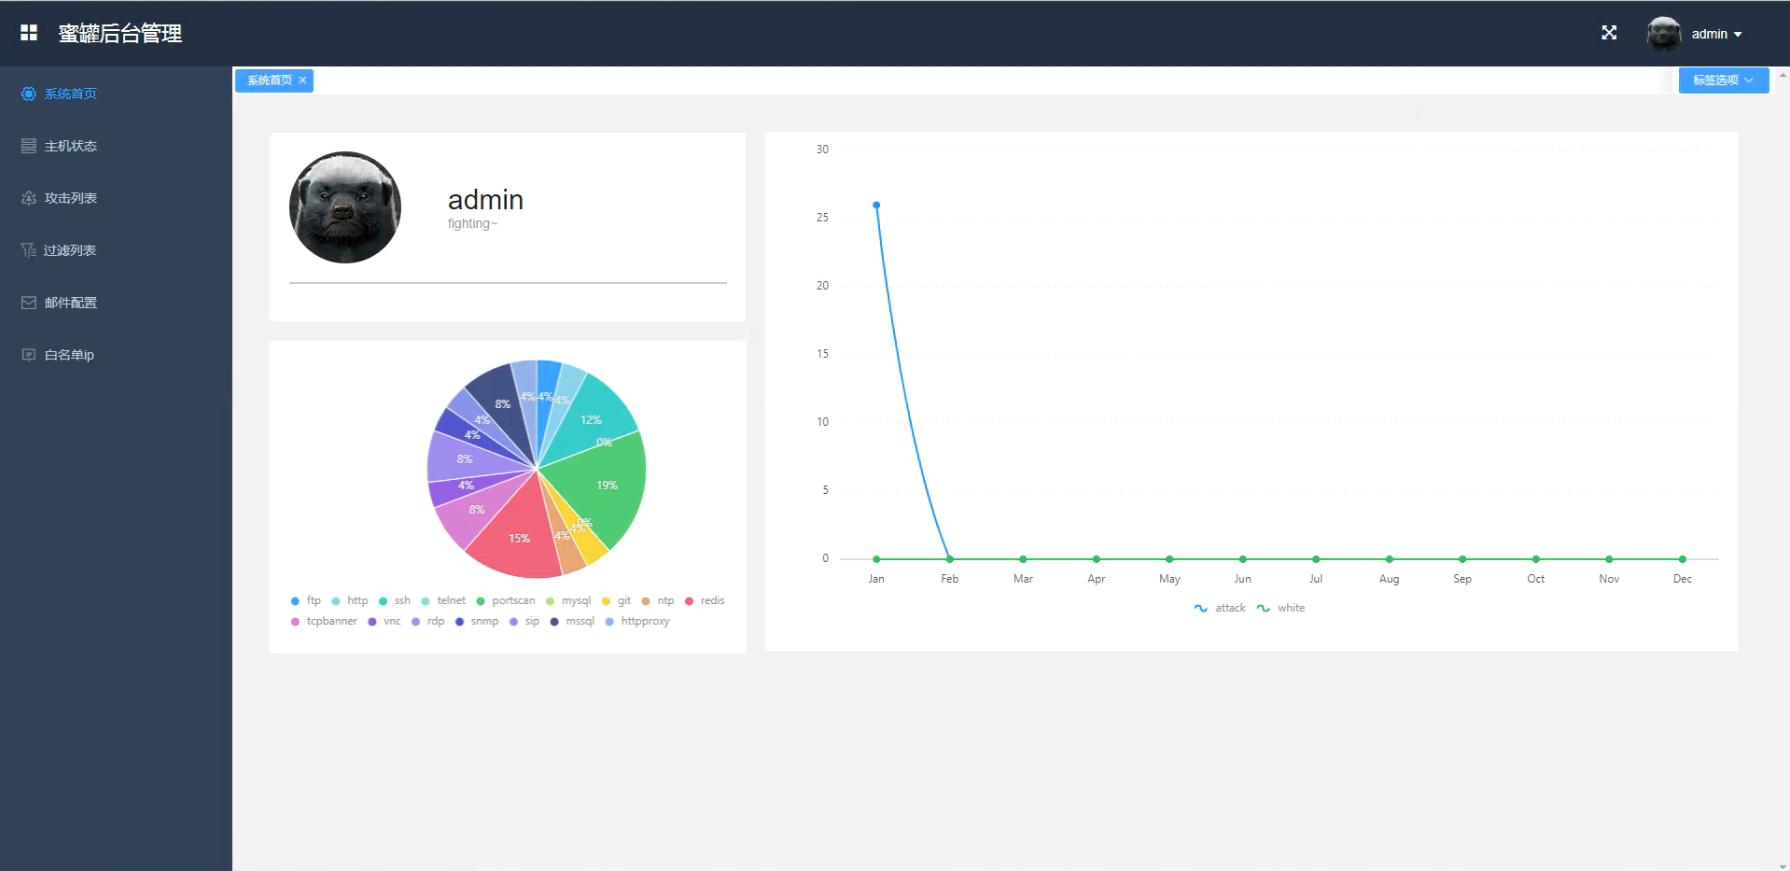
2.7.2 管理控制台:

三、安装客户端
当蜜罐管理后台部署完成之后,可以重新启用一台虚拟主机部署客户端。
这里优先推荐使用Centos7因为系统比较新默认python环境为2.7.x,类库也比较新。
3.1 系统配置
系统:Centos 7
Python: Python 2.7.X
安装扩展源
yum -y install epel-release
安装依赖
yum -y install libpcap-devel openssl-devel libffi-devel python-devel gcc python-pip gcc-c++
3.2 安装opencanary客户端
cd /usr/local/src/
git clone https://github.com/p1r06u3/opencanary.git
cd opencanary/
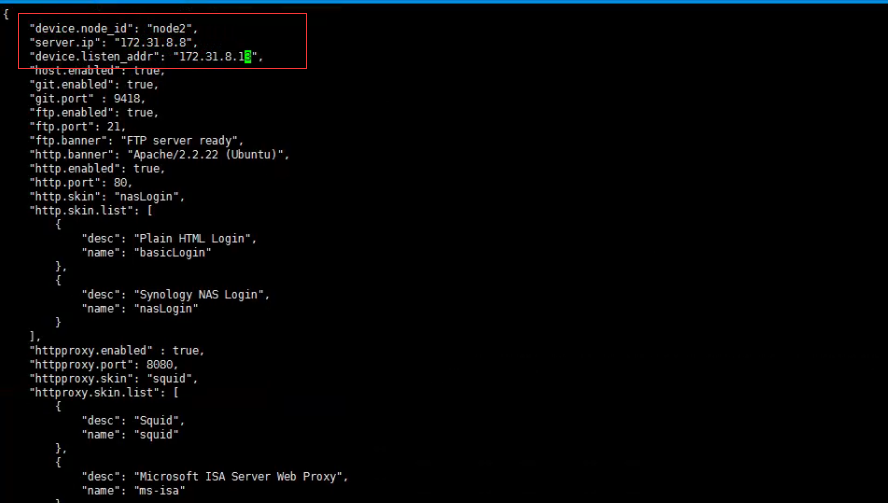
修改配置文件:
vi opencanary/data/settings.json
将第2行,device.node_id的值opencanary-1代表将来告警的节点,改为主机名
"device.node_id": "node2",
将第3行,server.ip改成自己web服务端的ip
注意: 如果你的web端,不是80端口,要在配置的ip后面跟上“:端口号”。
"server.ip": "172.31.8.8",
将第4行,device.listen_addr改成自己本机ip(非127.0.0.1)。
"device.listen_addr": "172.31.8.13",

3.2.1 安装opencanary
python setup.py sdist
cd dist
pip install opencanary-0.4.tar.gz
3.2.2 配置端口扫描发现功能
端口扫描发现模块是依赖于iptables;需要rsyslog配合产生kern.log日志。
安装iptables
yum install iptables-services
配置rsyslog
通过rsyslog 控制日志产生位置: vim /etc/rsyslog.conf
修改第50行
kern.* /var/log/kern.log
3.2.3 重启rsyslog
systemctl restart rsyslog
3.2.4 启动和停止opencanary方法
若第一次安装opencanary,需要先运行opencanaryd --copyconfig,会生成/root/.opencanary.conf配置文件。
启动命令: opencanaryd --start
停止命令: opencanaryd --stop
重启命令: opencanaryd --restart
opencanary日志: /var/tmp/opencanary.log
3.2.5 启动opencanaryd
opencanaryd --start
查看进程:
ps -aux | grep opencan
root     21586  0.1  4.4 412296 83484 ?        Sl   23:46   0:00 /usr/bin/python2 /usr/bin/twistd -y /usr/bin/opencanary.tac --pidfile /usr/bin/opencanaryd.pid --syslog --prefix=opencanaryd
在后台管理页面查看主机状态:
可以看到新增加的node2节点已经出现在管理页面里
3.2.6 卸载opencanary方法:
首先卸载旧客户端
opencanaryd --stop
rm -rf /root/.opencanary.conf
rm -rf  /usr/local/src/opencanary/
pip uninstall opencanary -y
iptables -t mangle -F

安装新客户端
curl -O https://raw.githubusercontent.com/p1r06u3/opencanary_web/master/install/install_opencanary_agent.sh
bash install_opencanary_agent.sh
四、后台可统计的信息
1.ftp登录尝试;
2.http访问请求;
3.http登录请求;
4.ssh建立连接;
5.ssh远程版本发送;
6.ssh登录尝试;
7.telnet登录尝试;
8.全端口(SYN)扫描识别;
9.NMAP OS扫描识别;
10.NMAP NULL扫描识别;
11.NMAP XMAS扫描识别;
12.NMAP FIN扫描识别;
13.mysql登录尝试;
14.git clone请求;
16.ntp monlist请求(默认关闭);
16.redis命令请求;
17.TCP连接请求;
18.vnc连接请求;
19.rdp协议windows远程登录;
20.snmp扫描;
21.sip请求;
22.mssql登录sql账户认证;
23.mssql登录win身份认证;
24.http代理登录尝试;

